and I thought Windows Media Center was the greatest thing since sliced bread...
If anyone is actually reading this, then if you are like me, you are:
- someone whose interested in doing something cool with their Christmas lights
- Have a slight touch of ADD and never read directions (not being offensive, just honest)
- Never learned electronics, and haven't a clue of where to start , but willing to learn.
- You buy not just a piece of equipment to learn, but go for the big guns (I restrained myself this time)
Here's what I wanted:
- To make my Christmas lights move (and if I can piggyback Halloween, then that's cool)
- Not spend an arm and a leg (though I can see outlets and cord being cha-ching)
- Leverage all the processing power of my computer
- To learn something new
Disclaimer
You should know something about electricity. So, if you get electrocuted, it's not my fault.You should also know that putting too much voltage in a component not able to handle it will most likely "poof" your component. Volts are like pressure. If you put too much air in a balloon, it will pop. Same deal with your electronics.
NOTE: I had to teach myself some basics about Ohms law and all that. Also needed to learn about the coding bands on resistors and what the hell that all meant.
Ingredients
- Bought an Arduino Uno R3 (Revision 3) from a company called Adafruit
- Also bought a clear breadboard (first time I used one - from Adafruit)
- Bought some jumper wires (same deal, first time I used one, also from Adafruit)
- A USB cord. It's a "type -b" cord (ask Mr. Google about "usb type-b")
- Downloaded Vixen for Windows
- I gutted some old LED Christmas lights, and I had some resistors from another project I'm working on.
Here's what the unit looked like when it arrived:

- I had plugged in the arduino before doing all this , hoping that Win7 would find the driver. Since nothing happened, I went to Mr. Google and asked him about "arduino windows drivers".
- Downloaded the driver (to: c:\users\mike\arduino )
- Then go to: Control Panel --> Device Manager (saw an unidentified device)
- Right click --> Properties --> Driver tab --> Update Driver and pointed it to the directory where I download
- Got all sorts of warnings that Windows couldn't verify the driver (installed it anyway)
NOTE: The installer is not really an installer.. so programs won't go under c:\program files, so wherever you unzip the package, that's where it will run from (unless you're smart and unzip it to c:\program files\arduino)
NOTE: If not installed, you will be prompted to install the Java Development Kit. You will get re-routed to the Oracle site, and choose and install the appropriate file.
At this point, you machine should recognized the Arduino
NOTE: The COM port stuff is very important. My USB was talking to the Arduino on COM3.
(just keep that in mind)
Go to the directory where the Arduino software was installed, and fire it up. Set the correct COM port. Most likely. it's going to be COM3.

Take a LED light, plug one end (the long) into slot "13" on the Arduino board, and the other end (short) in the "GND" socket.
Open up a project
Go to your computer, click "File --> Examples --> Digital --> BlinkWithoutDelay"
Then "Sketch --> Verify/Compile"
Then "File --> Upload"

Getting Vixen to Talk
You need to set the code on the Arduino to accept signals from your computer
Here's the code and some explanations
ANOTHER NOTE: I'm not the original author. The original code was doing all sorts of port re-assignments.
I'd rather have things simple and straightforward.
// PWM Output - ChanX=PWM Pin int Chan1 = 1; int Chan2 = 2; int Chan3 = 3; int Chan4 = 4; int Chan5 = 5; // Digital Output - ChanX=Digital Pin int Chan6 = 6; int Chan7 = 7; int Chan8 = 8; int Chan9 = 9; int Chan10 = 10; int Chan11 = 11; int Chan12 = 12; int Chan13 = 13; int i = 0; // Loop counter int incomingByte[13]; // array to store the 13 values from the serial port //setup the pins/ inputs & outputs void setup() { Serial.begin(9600); // set up Serial at 9600 bps pinMode(Chan1, OUTPUT); // sets the pins as output pinMode(Chan2, OUTPUT); pinMode(Chan3, OUTPUT); pinMode(Chan4, OUTPUT); pinMode(Chan5, OUTPUT); pinMode(Chan6, OUTPUT); pinMode(Chan7, OUTPUT); pinMode(Chan8, OUTPUT); pinMode(Chan9, OUTPUT); pinMode(Chan10, OUTPUT); pinMode(Chan11, OUTPUT); pinMode(Chan12, OUTPUT); pinMode(Chan13, OUTPUT); } void loop() { // 13 channels are coming in to the Arduino if (Serial.available() >= 13) { // read the oldest byte in the serial buffer: for (int i=0; i<14; i++) { // read each byte incomingByte[i] = Serial.read(); } digitalWrite(Chan1, incomingByte[0]); digitalWrite(Chan2, incomingByte[1]); digitalWrite(Chan3, incomingByte[2]); digitalWrite(Chan4, incomingByte[3]); analogWrite(Chan5, incomingByte[4]); analogWrite(Chan6, incomingByte[5]); digitalWrite(Chan7, incomingByte[6]); digitalWrite(Chan8, incomingByte[7]); analogWrite(Chan9, incomingByte[8]); analogWrite(Chan10, incomingByte[9]); analogWrite(Chan11, incomingByte[10]); digitalWrite(Chan12, incomingByte[11]); digitalWrite(Chan13, incomingByte[12]); } } |
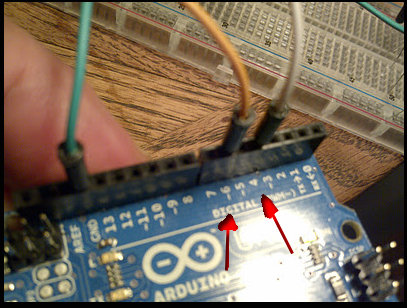
NOTE !!!!
- Slot 4 is a digital slot
- Slot 6 is an analog slot ( the "~" symbol next to the number '6' below)
- I'm only using 13 channels, since the board below has 13 channels.
- Also, check out the baud speed above.
Up next.. the breadboard